There's nothing you can't do.

Tuesday, January 24, 2012

Make Your Own Laundry Detergent

If you're looking for easy ways to save money on household items, one easy way you can do so is to make your own laundry detergent. I started making my own a little over 2 years ago because the commercial detergents' scents were too strong for me, and the "Free" products were expensive. This recipe works well in our front-loading machine. It cleans well (I do still use Oxyclean spray to pre-treat heavy stains, but everything else comes right out), has a very light scent, and is easy to make. Plus, I love the fact that as long as I'm well-stocked on the ingredients, I never run out - I just make more when I need it!

What You'll Need:
-2 cups Arm & Hammer Super Washing Soda (in the laundry aisle, but regular baking soda works if you can't find it)
-2 cups Borax
-1 bar Ivory soap
-Air-tight storage container


First, grate the bar of soap.


Then, add the Washing Soda and Borax. Mix it all together.


Transfer the mixture to air-tight storage, and that's it! I use 4 Tbsp. of this powder in our small front-loader. If you have a larger machine, you may want to try a little more.

Friday, January 20, 2012

How to Make Your Own Photo Mat

Do you ever find a great frame and it's close, but not quite the dimensions you need for your photos and prints? A pre-made photo mat would take care of the uneven edges for you, but even the cheap mats can get pricey. Making your own with traditional materials can get tricky if you don't measure and cut just right. Instead, you can make a quick and easy custom photo mat that will look great and be ready in minutes, with no special tools or equipment.

What You'l Need:
-Frame
-Picture(s)
-Ribbon
-Scotch Tape
-Scissors

First, start with your pictures and frame. This frame and mat looked good, but the pictures were slightly smaller than the pre-cut openings.


 I happened to have some narrow blue velvet ribbon that would not only even out the photo edges, but give the frame a nice little splash of color.

I cut four pieces of ribbon for each opening and taped them in place. The lengths don't have to be exact, as long as the exposed edges look uniform.


There you have it! It looks much better, and only took a few minutes. 


This also works if you don't have any mat at all - I used a wider ribbon for a situation like this:


Using your own ribbon allows you to be more creative, too. You can layer them for added color and texture, or use ribbon with printed designs to match your decor. The possibilities are endless!

Tuesday, January 17, 2012

Does your nose run when you run?

If you're a runner, you're probably familiar with the term, "snot rocket." There are a few good reasons why we get runny noses when we run - most races and training schedules occur in the mornings, when the weather is cooler, and cooler temperatures make runny noses. Most runners try to inhale through their noses, which means dust and pollution can get filtered out of the air and trapped in nasal passages. Those irritants can also cause noses to run - it's just the nose doing its job to keep that other stuff out of your body.

While I may see the logic in my runny runner's nose, I don't particularly enjoy the idea of blowing my nose out into the air. My southern sensibilities aren't exactly keen on some of the other options, either, like blowing my nose into my sleeve or hand. 

So, I constructed a little hidden pocket in my running shirt. It makes a nice little, "snot pocket" in which to blow my nose while I'm running. It's double-lined, and it folds back up on its own, so that the snot is tucked away inside.

What you'll need:
Running shirt
Handkerchief
Needle and thread (or sewing machine)
Scissors

To start, fold the handkerchief in half, then cut the folded hanky in half. 


I cut mine in half to make it less bulky, but this is a personal preference. If you wanted, you could make it full size, or cut it even smaller if the half-size is still too bulky for your tastes. 

Since I cut the finished edge, I hemmed the cut, unfinished edge of the hanky so it wouldn't ravel. 

I just folded a small piece over, stitched it, folded again, and stitched again. I didn't bother measuring or pinning - it really shouldn't matter for this project.

Next, I folded the hanky like a fan or accordian. I positioned the hanky so that it followed the curve of the shirt's neckline and pinned the edges onto the inside of the shirt. 


I sewed the outside edges to the shirt. I then sewed the inside single fold to the shirt following the neckline. 


This stitch should help it fold back into place after you use it.

Now I can blow my nose into a hanky while I'm running, with just one hand and without slowing my pace, and the hanky will just fold back up into my shirt! 


Saturday, January 14, 2012

How to Save Money and Actually Enjoy Chuck E. Cheese's

Oh sure, kids can be kids at Chuck E. Cheese's, but few other restaurants cause an adult to groan at the mere mention of the name. It doesn't necessarily have to be this way, though. If you time it right, it can be almost as much fun for you!

Before You Go
There are almost always coupons and free tickets to be found online. First, visit the Chuck E Cheese's website, where you should be able to win some free tickets. Click on Chuck E-Games, and you should be able to find at least one game you'll be able to play in order to win free tickets.


The current game (above) is Chuck E Blocks. Play the game (it shouldn't be too hard), print out your winnings, and take the sheet with you to the store.

You'll also want to check RetailMeNot for other coupons. Many times, you will find printable coupons for extra tokens here.


I have used some of the coupons listed here, and they have worked every time for me!

When to Visit
This can really make or break your CEC experience. Bar none, go as early as possible, preferably on a weekday. There are 3 really important reasons for this:
  1. Everything is nice and clean, and probably germ-free.
  2. There aren't many people there (you'll probably be the only ones there, if you get there early).
  3. If you get there early, Monday - Friday, you have an excellent chance of getting A LOT of free tickets! This is what makes the CEC experience fun for me, as an adult. There's no denying: it feels great to get a bargain! My local CEC opens at 9 each day. If I get there between 9 and 10, we're usually the first there. The lucky CEC staff that open the shop also get to test each and every game, and...they leave the tickets in each game for you to take! 

The employees test the Ticket Muchers, too, so don't forget to check those! On our most recent visit, we got 395 free tickets, before we paid a single dime for a token! Surprisingly, we got there at 10:30, 1 1/2 hours after they opened.

So, by the end of the day, this is what we took home, for only about $15!

How awesome is that? Yes, I realize the retail value of all of this is only about $6 (at most), but it's hard to put a dollar value on something as awesome as a man-sized mechanical mouse that sings to your daughter every hour on the 30!

Tuesday, January 10, 2012

Another T-shirt Yarn Scarf

After I made the last scarves from T-shirts, I came across this awesome-looking scarf made from t-shirt yarn and a crocheted cuff. I decided to give one a try, but since I don't crochet, I used a felted wool sweater. For the T-shirt yarn, I used three large t-shirts.


For the most part, I followed her directions, but my t-shirts didn't quite give me 12 strips that were 144 inches long. Mine were about 96 inches each, so I went with that. 


Since the felted wool sleeve's knit was very tight, I used a chop stick to push the edge through the bottom of the sleeve and out the other side, then I was able to pull them through until they hung evenly out each side. 

It isn't perfect, but I like it!

Friday, January 6, 2012

Make a Dog Sweater from an Old Human Sweater, New and Improved!

In a previous post, I made an ugly little dog sweater from an old human sweater. While it was easy to do, it wasn't very pretty, and I vowed to make something that would make my chihuahua proud to wear in public.

I picked up an old pink sweater from a thrift shop, and the sleeve was the perfect size for him.

It's so easy! All you have to do is:
1) Make sure the cuff fits comfortably over your dog's head.

2) Cut holes for the front legs.
3) Cut an opening in the lower belly so your dog can do his or her business without getting the sweater dirty.
4) Finish the edges with a zigzag stitch (on the machine) or a whip stitch (by hand). Note that if you use a felted wool sweater (100% wool sweater, shrunk to felt by washing in hot water and drying in the dryer), you don't have to worry about loose threads and won't need to finish the edges.


 He loves it!

Thursday, January 5, 2012

T-shirt Yarn Crafts

I found a beautiful necklace on Etsy, and it's made from T-shirt yarn.


Isn't that gorgeous? How have I never heard of  t-shirt yarn before? So I did a little investigation (aka a search on Google), and it turns out that it isn't all that hard to make.

Here is a handy tutorial on how to make t-shirt yarn (or t-rope, as the instructor calls it), and this video shows you how to use t-shirts to make a couple of different types of scarves. I happen to have a few old t-shirts that I was hoping to do something with, so I pulled them out and started experimenting.


My first attempt wasn't exactly what I'd hoped it would be: I started with the blue and it didn't seem full enough, so I added in a couple of pieces of white to each side. It still just looked like an old, shredded t-shirt to me, though.


I had much, much better luck with the loose t-rope strands, though. I thought they turned out awesome, and I wanted to dress them up a bit. I loved the look of the fabric rose on the one pictured for the scarf tutorial, so I found this online tutorial to make a pretty, fabric rose.


I think it turned out great! The rose really does dress it up, and I love the look that burning the petals' edges gives it.

I sewed the rose onto a fabric-covered elastic band to make it easy to attach to the scarf (or a hair band, or anything else!). I can just loop the elastic over the rose, then fold the outer petals down to cover it.

So, I still wanted a flouncy, ruflle scarf, so I hit up the local thrift store and found a couple of t-shirts for $1, brought them home, and got to work.

I'm still in shock at how quickly you can make a t-shirt scarf using the methods in the video above. I made two new ones in about 30 minutes, at a cost of $2, plus the cost of a little fabric glue.

These turned out much, much better! I found the secret to getting a pretty ruffle is to start wide then taper slowly as you go, ending with a narrow cut. That really did make all the difference!

Here are the two new ruffle scarves:


 I would never guess that they were made with t-shirts!

Now, back to that necklace...I'm pretty sure I'd never be able to make something that cute, so for now I'll just have to leave it in my Etsy favorites. Hopefully I'll be able to buy it (or one like it from her lovely shop) very soon!

Monday, January 2, 2012

Wal-Mart

Love it or hate it, you have to admit: Walmart attracts the weirdos.

Good Drink

Know what makes an excellent mixer? SoBe lifewater. It's incredibly yummy all by itself (every flavor I have tried so far, although Acai Fruit Punch is most excellent with Vanilla Vodka).

I used to be a die-hard diet soda drinker. Seriously, I was an addict. I was finally able to kick the habit last year after reading Anticancer, A New Way of Life, a phenomenal book about proven ways to minimize your risk of getting cancer. It seriously should be required reading for all humans. Cancer is no joke.

Not only does SoBe lifewater taste great, the sweetener used in it is a naturally derived antioxidant.

And did I mention it's a great mixer?

Saturday, December 31, 2011

Getting Organized for the New Year

I frequently find myself going through piles of stuff that, over time, accumulate on our kitchen table. It drives me crazy. I have also been on the search for a tidy way to keep my four-year-old daughter's art supplies in a place that is convenient for her to grab them whenever she wants.

After searching for weeks, I picked up a few things at the office supply store that worked for us. This is how they look in action! I also added a chalkboard area where we can write messages, menus, and other important info.


This is what I used:


-Cordless drill/screwdriver
-Chalkboard paint and paintbrush
-Drywall screws
-Metal mesh office organizers (I used two small trays out of a four-drawer storage cabinet, two wall file holders, and one small round pencil holder)

The metal items for the wall came in silver and black, but you could easily match your decor by covering them with a couple of coats of paint. I prefer Rustoleum for metal - it always seems to cover the best and is available in a wide array of colors.

The first step is to plan your space. I had a small wall with a round table in front of it, so I was able to put the small trays low and toward the corner. That way, my daughter is able to reach them but they won't be in the way of anyone using the table. I roughly sketched out an area for the chalkboard paint (freehand outline with a pencil), and then evenly spaced the two file holders between the paint and small drawers. I added the small round cup to hold a piece of chalk and small cloth for the chalkboard.


The top file holder will be used for our mail, bills, magazines, and other items that used to take up space on our table. The bottom file holder is for my daughter's drawing paper and coloring books.

Installation is pretty easy if you're familiar with using a drill and screwdriver. Just be sure to use drywall screws if you're hanging these on drywall (or sheetrock). Otherwise, you run the risk of the screws pulling out over time, and everything in your baskets will spill out. 

I didn't use a level, but if you're picky and don't want to just eyeball it, you might want to use a level to make sure they're level and evenly spaced before drilling your holes.

I then painted the chalkboard area. I used two coats, but on some walls, it may take three. Painting thin, even coats works better than one heavy coat. 


There you have it! So far, we all love it, and it really has tidied up our kitchen.

Wednesday, December 28, 2011

New World Pumpkin Soup

This is my favorite pumpkin soup! I came across this recipe a couple of years ago, and it's best with freshly cooked pumpkin.

This is the original recipe. I modified it to accommodate the ingredients I had on-hand:

    -Pumpkin, cooked, 4 cups, mashed 
    -Chorizo sausage, 12 oz 
    -Garlic, 3 cloves 
    -Milk, canned, evaporated, 1 can (13 oz) 
    -Chicken Broth, 2 cup (8 fl oz) 
    -Oregano, ground, 1 tsp

1. If using fresh chorizo, take it out of the skin and break it up into the pan. Cook until sausage is brown. 2. Add garlic and stir until fragrant, 30-60 seconds. 
3. Add the rest of the ingredients, ending with the chicken broth. Add as much broth as you need to make it the thickness you want. Salt to taste.

Serving Size: Makes 7-1 cup servings

Nutritional Info
  • Servings Per Recipe: 7
  • Amount Per Serving
  • Calories: 305.0
  • Total Fat: 22.3 g
  • Cholesterol: 58.3 mg
  • Sodium: 1,074.6 mg
  • Total Carbs: 10.3 g
  • Dietary Fiber: 0.9 g
  • Protein: 15.9 g

Saturday, December 24, 2011

Painted Christmas Angel Pedestal Plate

If you find yourself looking for a simple, handmade holiday gift that your children can help make, a painted Angel plate is a great choice!

What You'll Need:
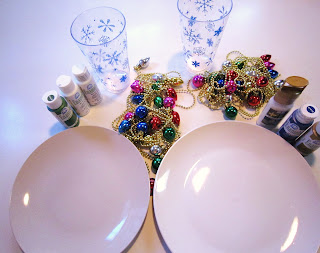
-Plain White Plate (I found these at the Dollar Tree)
-Drinking Glasses (again, these holiday glasses were purchased at the Dollar Tree)
-Folk Art Acrylic Paints (you will need a background color and white)
-Tulip Brand Dimensional Paints (you will need gold and white or clear)
-Strands of Holiday Decorations (Found at the Dollar Tree)
-Thin Cardboard (not pictured)
-Tissue paper (not pictured)
-Glue (not pictured)


To start, paint the top of the plate in whatever color you prefer. We chose a pretty shade of blue, and my four-year-old did a great job of painting (as usual).


Let the background paint dry completely. Then, paint your child's hands(palm side) in white, and ask him or her to make an angel on the plate by placing the thumbs together, then holding the fingers on each hand together, and pressing his or her hands to the plate. This is what it will look like:


Use your dimensional paint to add the angel's halo, name, the year, and any other details you wish. We added stars and a squiggly line around the edge to give the plate a decorative border. Let the dimensional paint dry.

The plate would make a great gift as it is now, or you can continue if you wanted to make it a pedestal plate. To do so, all you need to do is glue the glass onto the bottom center of the plate. I prefer Quick Grip Glue.


Place your holiday strands and tissue paper into the middle of the glass. The tissue paper will make the decorations more visible. Allow the glue to dry.

When the glue is dry, turn the plate right side up, then trace the bottom of the glass onto the cardboard. Cut out the circle, then place the circle up into the inverted glass. This will help to hold the Christmas decorations in the glass.

Here is the finished product!

Friday, December 23, 2011

Christmas Veggie Wreath

My friend, The Domestic Goddess (or at least pretending to be), posted this recipe and I thought it sounded perfect to take to an upcoming Christmas party. I changed it up just a little (cheated, actually, by using the philly veggie spread), but overall it was super easy to make, and it was delicious! It was also a big hit at the party, and we only brought a tiny bit home. 

Here is my recipe, modified from the original (linked above):

2tubes (8 ounces each) refrigerated crescent rolls
1container Philadelphia brand Garden Veggie spread
1– 1½ cups chopped fresh broccoli florets
1cup finely chopped celery
1 finely chopped red bell pepper
A fewred cabbage leaves or lettuce leaves
Remove crescent dough from packaging (do not unroll). Cut each tube into eight slices. Arrange in an 11-in circle on an ungreased 14-in pan. Bake at 375 for 15 – 20 minutes or until golden brown. Cool for 5 minutes before carefully removing to a serving platter; cool completely.
Spread the cream cheese over wreath; top with broccoli, celery and red pepper. Form a bow garnish with cabbage or lettuce leaves. Yield: 16 servings
And here is the finished wreath! I love the colors - it all looked so festive!


Monday, December 19, 2011

Make Your Own Vanilla Extract

In the DIY world, making your own vanilla extract is a perfect 10 on the Easy Scale. Plus, it makes a great gift that will impress your friends and family when you tell them that you made it yourself. While it's easy to do, it does take a little time (at least a month), so it requires a little advance planning.

What You'll Need:


-Vanilla Bean
-Jar or container with a tight fitting lid
-Vodka
-Measuring cup
-Kitchen shears or a sharp knife

To start, cut your vanilla bean length-wise, not quite all the way, so that you have a big V.


Place the cut bean into your jar/container, and add 1 cup of vodka.


Tighten the lid, give it a good shake, then place it into a dark place (cabinet or pantry) for about a month.


Shake it every day or two, and after a month, you'll have your own vanilla extract!


If you want to give it as a gift, strain it using a coffee filter or several layers of cheesecloth, and transfer it to a prettier container. There you have it! The best part is that as you use it, you can add more vodka to replenish what you've used.