There's nothing you can't do.
Showing posts with label gift. Show all posts

Thursday, August 31, 2023

Maximizing Performance: The Rise of Gaming Sleeves in Competitive Esports

In the fast-paced realm of competitive esports, players are constantly seeking innovative ways to gain an edge over their opponents. A new trend has emerged that promises to revolutionize the way players enhance their performance – gaming sleeves. These full-arm compression sleeves have taken the esports world by storm, proving to be more than just a stylish accessory.

Designed to be worn on a player's mouse arm, gaming sleeves serve a critical purpose – to minimize friction between the hand and the mousepad. The rigors of extended gaming sessions can lead to discomfort and even injury, with friction-related issues being a common concern. This is where gaming sleeves step in as a game-changer.

One of the primary advantages of these sleeves lies in their ability to significantly reduce friction. Imagine the scenario: intense gameplay, split-second decisions, and rapid mouse movements. All of this can take a toll on the player's hand and wrist, leading to discomfort or worse, rug burns. Gaming sleeves act as a protective barrier, preventing these friction-induced irritations, and allowing players to focus solely on their performance.

However, the benefits of gaming sleeves go beyond injury prevention. By mitigating friction, these sleeves create an environment of seamless interaction between the hand and the mousepad. This translates to smoother, more fluid movements, enabling players to maneuver their mice with unparalleled precision. The reduced resistance becomes a catalyst for improved in-game performance – a factor that can make a world of difference in high-stakes esports competitions.

As esports continue to gain recognition as a legitimate sporting activity, the focus on player well-being and performance optimization becomes paramount. Gaming sleeves have quickly asserted themselves as a crucial tool in this pursuit. No longer just a novelty, these sleeves have become a symbol of dedication to the craft and a testament to the lengths players are willing to go to for that extra ounce of advantage.

In conclusion, the emergence of gaming sleeves as an accessory of choice among competitive esports players is a testament to the ever-evolving nature of the industry. Beyond the aesthetics, these sleeves tackle a fundamental challenge by reducing friction and enhancing player performance. As esports competitions reach new levels of intensity, the adoption of such accessories underscores the players' commitment to staying ahead of the curve. Whether it's preventing discomfort or fine-tuning precision, gaming sleeves have woven themselves into the fabric of esports excellence.

If you're ready to try a gaming sleeve of your own, check out the IGNITEX offering on Amazon.com. It's highly rated and competitively priced. This is a purchase you won't regret!


McGalver is a participant in the Amazon Services LLC Associates Program, an affiliate advertising program designed to provide a means for sites to earn advertising fees by advertising and linking to Amazon.com.

Thursday, February 28, 2013

How to Paint a Wine Glass

Painted wine glasses make a great gift for any occasion. Most of the time the Dollar Tree has the extra large glasses for only $1, so they're really an economical gift also! Creating a custom, one-of-a-kind gift is easier than you might think - you can paint anything you'd like on the glass in just a few simple steps, even if you've never painted anything before!


This is the finished product, although I wish I'd taken a better picture of it. My friend is a nurse, so I painted her name, this picture, and, "Trust me, I'm a nurse. This won't hurt at all..." on the glass.

What You'll Need
-Wine Glass
-Rubbing Alcohol
-Pebeo Paints for porcelain or glass (I used the pens and paint but you could use either/or)
-Brushes (if using the paint)
-Oven
-Photo or stencil, if you don't want to draw free-hand
-Tape


First, I found a photo that I liked and printed it out. You could also use a picture from a magazine or other source, or something you drew yourself. For copyright reasons, you'd never want to use someone else's drawing if you plan to sell these, though.

I trimmed the photo and taped it to the inside of the glass, then prepared the outside of the glass by cleaning  it with rubbing alcohol. From there, I really just used my pens to trace the picture, and filled in the hair with my gold paint.


I added my text, then after the paint dried, I baked it in the oven at 300 degrees F for 30 minutes to set the paint and make it durable. That's it! The paint holds up well - in my experience, the Pebeo paints are the best for glass and ceramics. This technique will work on any glass or mug. I have a test mug that I run through the dishwasher regularly, and the paint looks brand new. I do recommend hand washing, though, just in case.

The recipient really went crazy for this glass - it was so much fun to make and give!
\

Friday, February 22, 2013

How to Make Bath Tea

As I mentioned in yesterday's post, I recently made bath teas to give as gifts. I made quite a few and plan to use them for a Grandmother gift for Mother's Day, Thank You gifts for a few friends, and Teacher's Gifts for Teacher's Appreciation Day (more Scent-sational Teacher gifts).


These were really easy to make, and I tested one out in the bath and it was very relaxing!

What You'll Need:


-Tea mix (from this recipe - I used dried lavender and jasmine oil for my scented ingredients)
-Scissors, thread, and needle OR stapler
-Coffee filters
-Fabric paint (optional)
-Printable business cards  (optional, for tags / labels)


Making the tea bags is pretty straightforward. First, place some of the "tea" into the center of a coffee filter. I learned quickly that less is more - if it is overfilled, the assembly is harder. Roughly 1 tablespoon worked well for me.

Make sure the tea is in the center of the filter, and start folding the sides inward.


Fold the top together. I also added a piece of embroidery floss so that the recipient can hang it from the faucet if she wishes, so that the warm water will flow through it.


Staple the top together.


Then fold the top and add one more staple (I just did this for a cleaner look and to make it more secure).


I then used the fabric paint to decorate them. I used flowers and other little symbols, but you could also include monogrammed initials, the recipient's name, or short messages such as #1 Grandma.


It was a fun project, and my work room still smells great! I think I'll save a few for myself.


Thursday, February 21, 2013

How to Make an Easy Gift Container

I recently made some bath teas to give as gifts (more about that later), and I found myself in need of containers for them. Rather than using a ziploc bag or something similar, I thought I'd reuse a few plastic containers from our cabinet to create something pretty (and airtight!).


What You'll Need:

-Plastic container
-Paint (I used spray flat enamel for the white and tinted wall paint for the border)
-Ribbon or other decorations
-Sharpie / Marker
-Glue

This was what I started with - it once held cheese. It isn't recyclable in this area, so it feels good to dress it up and use it for something nice.

All you have to do is paint the lid, glue on your bow or other decorations, then write the recipient's name on the lid using the marker. I chose the font I mentioned in this post to fancy it up.

That's it! I filled it up, gave it, and the recipient loved it!


Thursday, September 27, 2012

An Easy Gift For Your Man

It's always hard to find a good gift for a man - all the men in my life buy something the minute they want it. My husband was in need of a small box to place the items from his pockets at the end of each day, though, and I was lucky enough to find this pretty wooden box at a local thrift store.


It was in great shape but had a couple of nicks and scratches in the wood. I wish I'd taken a before picture, so you could see how easy those were to fix using Restor-a-finish by Howard. 


I can't say enough good things about this stuff - it rocks. I use it for any real wood - on our bedroom furniture, dining room table, wooden trim on the stairs...it really just works great, with no sanding or refinishing. 
I cleaned up the inside of the box using a lint roller, and I added a photo of my daughter and me to the little indented spot in the lid, for a personal touch.


We gave it to my husband for his birthday, and it was a big hit!

Wednesday, June 13, 2012

Quick and Easy Father's Day Crafts for Dads and Grandpas

It's nearly Father's Day, and if the men in your life are anything like mine, they already have everything they need. This leaves me searching for new ideas every year. Here are a couple of gifts we have made that the Dads and Grandpas loved:

Battery Garden


One Christmas, we gave my father-in-law a pack of batteries to power a new lantern that was separately wrapped. He opened the batteries first and went on and on about how he loved them and always needed batteries. Even after he opened the lantern, he told us how much he loved the batteries. So, it made me realize that men really do always need batteries, so why not make a cute little garden out of them and give them as a gift? My four-year-old decorated it herself and it was a fun project. I just helped cut holes in the boxes to hold the sticks, and added a little glue at their bases to hold the heavier batteries.


She had fun making it, and the Grandfathers both thought it was really cute. Be sure to tell them that they're new batteries so they'll be able to use them!

Painted T-shirts with Hand Prints and Footprints


Painted T-shirts are are a fun and simple gift, and my daughter always loves getting paint all over her, so be sure to wear old clothes if you make them! All you need is fabric paint (available at most craft stores) and plain T-shirts (they're cheaper at Wal-Mart, Dollar General, or a similar store than they are at craft stores).

Here are a few hand print / footprint designs:

"World's Best Daddy, Hands Down" with hand prints

"Best Granddaddy, Hands Down" with hand prints 


"My Granddaughter Walks All Over Me" with footprints


The best part of painting your own T-shirts is that you can customize them with whatever you call the Dads and Grandfathers in your life: Papa, Papaw, Grandpa, etc. Then, there's the added bonus of just getting messy with paint, so have fun with it!

Saturday, December 24, 2011

Painted Christmas Angel Pedestal Plate

If you find yourself looking for a simple, handmade holiday gift that your children can help make, a painted Angel plate is a great choice!

What You'll Need:
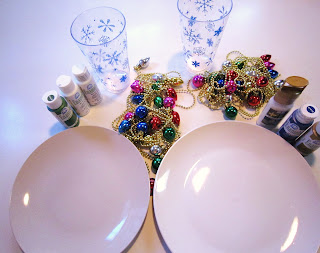
-Plain White Plate (I found these at the Dollar Tree)
-Drinking Glasses (again, these holiday glasses were purchased at the Dollar Tree)
-Folk Art Acrylic Paints (you will need a background color and white)
-Tulip Brand Dimensional Paints (you will need gold and white or clear)
-Strands of Holiday Decorations (Found at the Dollar Tree)
-Thin Cardboard (not pictured)
-Tissue paper (not pictured)
-Glue (not pictured)


To start, paint the top of the plate in whatever color you prefer. We chose a pretty shade of blue, and my four-year-old did a great job of painting (as usual).


Let the background paint dry completely. Then, paint your child's hands(palm side) in white, and ask him or her to make an angel on the plate by placing the thumbs together, then holding the fingers on each hand together, and pressing his or her hands to the plate. This is what it will look like:


Use your dimensional paint to add the angel's halo, name, the year, and any other details you wish. We added stars and a squiggly line around the edge to give the plate a decorative border. Let the dimensional paint dry.

The plate would make a great gift as it is now, or you can continue if you wanted to make it a pedestal plate. To do so, all you need to do is glue the glass onto the bottom center of the plate. I prefer Quick Grip Glue.


Place your holiday strands and tissue paper into the middle of the glass. The tissue paper will make the decorations more visible. Allow the glue to dry.

When the glue is dry, turn the plate right side up, then trace the bottom of the glass onto the cardboard. Cut out the circle, then place the circle up into the inverted glass. This will help to hold the Christmas decorations in the glass.

Here is the finished product!

Monday, December 19, 2011

Make Your Own Vanilla Extract

In the DIY world, making your own vanilla extract is a perfect 10 on the Easy Scale. Plus, it makes a great gift that will impress your friends and family when you tell them that you made it yourself. While it's easy to do, it does take a little time (at least a month), so it requires a little advance planning.

What You'll Need:


-Vanilla Bean
-Jar or container with a tight fitting lid
-Vodka
-Measuring cup
-Kitchen shears or a sharp knife

To start, cut your vanilla bean length-wise, not quite all the way, so that you have a big V.


Place the cut bean into your jar/container, and add 1 cup of vodka.


Tighten the lid, give it a good shake, then place it into a dark place (cabinet or pantry) for about a month.


Shake it every day or two, and after a month, you'll have your own vanilla extract!


If you want to give it as a gift, strain it using a coffee filter or several layers of cheesecloth, and transfer it to a prettier container. There you have it! The best part is that as you use it, you can add more vodka to replenish what you've used.

Monday, December 12, 2011

Felt Christmas Ornament with Recordable Greeting

Here is another great use for the voice recordable modules from the last post: an easy-to-make felt Christmas ornament with a recorded greeting inside it.

What you'll need:
-Felt pieces large enough for the front and back of the ornament. I just used 2 green triangles and a small brown rectangle to make a tree.
-Fabric glue or craft glue (I prefer Quick Grip Glue)
-Buttons, beads, ribbon, or other decorative items 

-Fiberfill 
-Voice Recordable Module (10 sec) - Available on Ebay
-Needle and thread


Putting your ornament together is pretty simple. My daughter helped pick out a few pretty buttons and ribbon, and she recorded the greeting on the module. We glued the decorations on the front of the ornament and let them dry.

Make sure you cut your felt pieces large enough to accommodate the module, but if you're tight on space, you can trim all the extra wires after you have recorded the greeting you want (and only after you have the greeting you want). To do this, trim off the wires that connect the record button (the red-wired button) and the microphone.


Now, place the module between the two pieces of felt and sew the two pieces together. When you have it nearly sewn together, add some fiberfill to the inside to give it some fluff. Be sure that the play button doesn't get lost inside the ornament - I kept mine at the top so it would be easy for the recipient to press.

Finish sewing the edges, and don't forget to add a ribbon or string at the top so that it can be hung on the tree!


These are great for kids to make, but they would also make a wonderful gift for a loved one who is far away, such as a husband or wife who is overseas during the holidays.

Sunday, November 6, 2011

Great Gift Idea: Pillow Personalized by Your Kids

With the Holidays right around the corner, many parents are trying to find fresh ideas to make a custom, personalized gift for friends and relatives. Sure, we have all done our share of crafts with the kids' hand prints and pictures on your home printer. You may have even picked up a recordable greeting card or two to give to your folks. Believe it or not, for only a few dollars each, you can make a keepsake pillow with all three - your child's hand print, a photo chosen by you, and a playable greeting recorded by you.


My daughter and I made these three pillows as Christmas gifts for her father and grandparents. They turned out better than I'd expected, and only took a couple of hours to make (not including the paint drying overnight). My favorite part is the fact that you can press a button in the pillow and hear my daughter tell each recipient, "Merry Christmas" and "I love you." Here is a video of the finished product. Step-by-step instructions can be found after the jump:


What you'll need:


-Fabric pieces large enough for the front and back of the pillow. I used colorful scraps for the front and muslin for the back.
-Fabric paint
-Inkjet Cotton Sheets
-Inkjet printer
-Fiberfill for pillow stuffing (not pictured)
-Voice Recordable Module (10 sec) - Available on Ebay
-Scissors
-Iron
-Paintbrush
-Paper and pen for heart pattern
-You'll also need either a sewing machine or needle and thread

To get started, decide how large you want your heart-shaped pillow to be. Fold a piece of white paper, then draw half of a heart along the fold. Cut your pattern.


Iron your fabric to get all the wrinkles out, then fold it so that you'll be able to use your pattern on it.


Place your pattern with the straight edge along the fold of the fabric, then cut along the curved edges of your pattern.


Next, get out the recordable modules and let your kids record their messages. The good news is that they can keep recording over and over until they get one that all of you like.

A couple of notes about the recordable modules: they're readily available on Ebay and other websites, but they all (unfortunately) appear to ship from overseas*. You'll want to keep this in mind for shipping times and availability - it may take a couple of weeks to receive them. Also, mine didn't come with instructions. To use them,  first remove a clear tab from the circuit board (just pull it straight out). This activates the battery connection. To record, press the button connected to the red wire. The button connected to the yellow wire is to play back. The third small round item is the microphone, and your children will want to put it close to their mouths when they speak. They can say anything you'd like (obviously). My daughter just kept it simple and said, "Merry Christmas, Daddy (Grandma, etc.). I love you."

Once you get the recording you want, clip the red-wired button off to avoid accidentally erasing your message. This will be crucial as you handle the module and put it inside your pillow.


You'll also want to somehow label which module is for which pillow, if you're making more than one at a time.


Next, coat your child's hand with fabric paint and let them put hand prints on the pillows.


At this point, replace the plain white paper in your inkjet printer with as many Inkjet Cotton Sheets as you'll need. Print out your pictures onto the cotton sheets. You may want to do a few test prints onto plain white paper first and check the photo sizes on your hearts, to make sure they're the size you'd like.

I then used fabric paint to paint the words, "Little Hands, Big Heart" on the fronts of the pillows.


Both the printed cotton and the fabric paint will need to completely dry before you proceed. Most manufacturers recommend 24 hours, but you will want to follow the manufacturer's instructions for your specific products.

Once the paint and photo print are completely dry, you're ready to complete the pillow. Place the hearts onto the fabric you chose for the backs of your pillows, and cut around the edges.


Remove the paper backing from your printed cotton photo and trim the excess cotton away from the photo.


Sew the cotton photo onto the back of the pillow.


Place the fabric pieces right sides together.


Sew them together, leaving an opening about 3 - 4 inches along one edge.


Turn the hearts right side out by pulling the fabric through the openings. Be sure to push the fabric all the way out along the seams so that the heart shape shows well. Get out your fiberfill.


Stuff your pillows with fiberfill.


I can't stress this enough: If you haven't already done it, double check your module one last time to make sure that it hasn't been accidentally erased, and if it's still intact, snip the red-wired button on your module. If you try to stuff it into the pillow intact, your message will surely be erased.


Place the module into your pillow. You'll want to leave the speaker (largest round part) near the fabric, and you'll want the yellow-wired button to be kept to the side. The rest can be placed into the middle, inside the fiberfill, so it will be cushioned. Once most of it is tucked away, place the yellow-wired button in the lower part of the pillow (the bottom of the V in the heart, if you will).


Close the opening in the seam by using your sewing machine or needle and thread.

I then used a foam sticker and pen to mark the button on our pillows, but you could either skip this step and demonstrate it yourself, or use any other temporary method of showing the recipient where to press the button to hear the greeting.


That's it! Obviously, if you wanted to skip any of these steps and, for example, just do the pillow without the greeting, or leave off the photo on the back, it would still be a cute keepsake that anyone would appreciate.


*Heads up American manufacturers! I would have gladly paid more if any American-made modules had been available.