There's nothing you can't do.
Showing posts with label grandparent. Show all posts

Monday, August 28, 2023

Getting Ready for Hurricane Season

We live on the East Coast of the United States, which means that we occasionally have a hurricane or tropical storm pass through. Every year about this time, we do a few things to get ready in case we lose power for several days. 

I recently read about a relatively new product that we've added to our hurricane readiness supplies: rechargeable light bulbs

It's a brilliant idea: these LED light bulbs look and function like any other light bulb, but they have a rechargeable battery inside plus an on/off switch on the side. The base fits into a regular socket. When installed into a lamp or wall socket and the lamp is turned on, the battery in the bulb is charged. If the power goes out, simply turn the switch on the side of the bulb to ON and Voila! You have light. 

Even better - remove the bulb from the socket and carry it around with you like a flashlight. We haven't used them for an outage yet, but each charge should give you up to 5 hours of continuous use when you need it. 


I'm not just excited about these bulbs for our own use, I'm planning to give them as holiday gifts this year. They're perfect for the grandparents and uncles that already have everything!


Illuminate Your Space and Stay Prepared with GE Rechargeable Emergency Light Bulbs

In the modern world, lighting serves not only as a functional necessity but also as an essential element of our living spaces. We rely on lighting to set the mood, create ambiance, and keep our surroundings bright and inviting. However, what happens when the power suddenly goes out, plunging us into darkness? That's where the GE Rechargeable Emergency Light Bulbs step in, offering a seamless blend of style, practicality, and preparedness.

Introducing the GE Rechargeable Emergency Light Bulbs

GE, a name synonymous with quality and innovation, presents a groundbreaking solution for those unexpected moments – the Rechargeable Emergency Light Bulbs. These bulbs are not your ordinary lighting fixtures; they are designed to ensure you never find yourself stumbling in the dark during power outages. Let's explore what makes these bulbs a game-changer for your home:

1. Continuous Illumination During Power Outages

The GE Rechargeable Emergency Light Bulbs are equipped with built-in batteries that automatically activate when the power goes out. This means that even in the midst of an outage, you'll have a reliable source of light to guide your way, preventing accidents and providing a sense of security.

2. Versatility at Your Fingertips

Beyond their primary function, these bulbs offer versatility like no other. Need a flashlight to navigate through your home? Simply detach the bulb from its fixture, and it transforms into a powerful handheld light. Whether it's searching for candles, checking on your loved ones, or just finding your way to the circuit breaker, the GE Rechargeable Emergency Light Bulbs have you covered.

3. Easy Charging and Usage

Charging these bulbs is as easy as screwing them into a standard light socket. You don't need any special equipment – just the fixtures you already have in your home. This simplicity ensures that your emergency lighting is always ready for action, without the need for extra cords or accessories.

4. Balancing Functionality and Aesthetics

One concern with emergency lighting is its appearance. We all want our homes to look beautiful and inviting, and bulky emergency solutions can disrupt that. However, these GE light bulbs seamlessly blend into your existing fixtures, offering the warm, comfortable glow you love while also providing a crucial safety feature.

Elevate Your Space and Your Preparedness

In a world where unexpected events can catch us off guard, having a reliable backup plan is essential. The GE Rechargeable Emergency Light Bulbs are not just light fixtures; they are a testament to innovation meeting everyday needs. With their ability to provide continuous illumination during power outages, versatile usage, and easy charging, they seamlessly enhance your living space while keeping you prepared for any situation.

Illuminate your space with style and stay prepared with the GE Rechargeable Emergency Light Bulbs. Experience the perfect blend of functionality and design – your future self will thank you when the lights unexpectedly go out.

Buy a pack for you or your loved ones today!


McGalver is a participant in the Amazon Services LLC Associates Program, an affiliate advertising program designed to provide a means for sites to earn advertising fees by advertising and linking to Amazon.com. 

Thursday, January 10, 2013

An Inexpensive, Easy Gift for a 60th Birthday

We'll soon attend a 60th birthday party, and everyone has been asked to bring 60 things as a gift. This could work for any birthday, but for some reason, 60 seems to be the popular number to do this sort of thing. Sure, we could take a jar of 60 jellybeans, a bag of 60 buttons, 60 postage stamps, or any number of other things. But what's the fun in that? I chose instead to make a custom, framed print of 60 words that describe the birthday girl.


Luckily, I was able to pick up a brand new float frame from our local thrift shop. I have great luck with frames there and got this one for only $7. The best part of the gift is that if she doesn't like the print, she can just replace it with photos and it's still a nice birthday present.

To make your own, here's what you'll need:

-Poster board
-Markers or pencils (I used three complimentary colors and alternated them)
-Straight edge
-Razor or scissors for cutting a straight edge

First, you'll want to decide on the size of your print. I Chose to keep the print's edges a couple of inches from the frame because I used a float frame. If you have a mat, you may want to fit it to that, or you could fill the whole frame. It's really up to you and the size of your frame.

Once you decide on the size, measure and mark your poster board accordingly. I left the poster board width as is, so I only needed to measure up each side.


I then used the straight edge to draw a line to connect my marks.


I used my razor knife to cut across the line. You could also use scissors, just ensure that you're cutting right on the line.


Once my paper was ready, I searched for an easy-to-draw font that would look good in the print. This page has a wonderful font that I found easy to use and I liked the way it looked on my page.


I came up with a list of 60 words. Thesaurus.com is an excellent resource for this, but you don't want to forget others like Mom, Daughter, Grandma, etc., as well as the person's name, when you're making your list. I kept the font list and the word list open on my screen while I worked.


I found it helpful to lightly write each word in pencil before I wrote it in marker. Since my marker colors weren't all dark, it worked best when I erased most of the pencil prior to using the marker. If you're using dark colors, you may not need to worry about that, though.


I wrote 59 of the words around the page, then saved the center area for her name, written much larger. There you have it! I framed it, and now it's ready to give. I think it turned out great, and I enjoyed doing it.


I have to warn you, though - the fancy writing took more time than I'd originally expected. I spent about 8 - 9 hours total on it, but I spread it out over the course of a few days so that it wasn't too tedious.

Wednesday, June 13, 2012

Another Quick and Easy Hand Print Gift - Framed Art!

If you're still looking for a quick and easy Father's Day gift, this isn't very difficult and is another fun craft for you and your kids: a hand print tree, as framed art!


What You'll Need:
-Posterboard
-Tempera Paint
-Pencil
-Colored Pencils
-Poster Frame


I used the pencil to sketch out a tree like the one below. If your kids like drawing and art, though, they could draw it themselves.


I wrote, "Happy Father's Day 2012" at the bottom in block letters, although my lettering needs quite a bit of work. A paintbrush probably would have been a better choice here, but this was my result:


Then, I rounded my up niece, nephew, and daughter, and let them add their hands to the branches. If I do this again in the future, I'll be sure to make the tree outline darker so it shows up more.


I then let it dry and place it into a poster-sized frame, and that's it! I picked up the frame for $25 at Big Lots, but lightweight poster frames can be found at Wal-Mart for even less than that.

Have fun with it, and to all the Dads out there: may you have a Happy Father's Day!

Quick and Easy Father's Day Crafts for Dads and Grandpas

It's nearly Father's Day, and if the men in your life are anything like mine, they already have everything they need. This leaves me searching for new ideas every year. Here are a couple of gifts we have made that the Dads and Grandpas loved:

Battery Garden


One Christmas, we gave my father-in-law a pack of batteries to power a new lantern that was separately wrapped. He opened the batteries first and went on and on about how he loved them and always needed batteries. Even after he opened the lantern, he told us how much he loved the batteries. So, it made me realize that men really do always need batteries, so why not make a cute little garden out of them and give them as a gift? My four-year-old decorated it herself and it was a fun project. I just helped cut holes in the boxes to hold the sticks, and added a little glue at their bases to hold the heavier batteries.


She had fun making it, and the Grandfathers both thought it was really cute. Be sure to tell them that they're new batteries so they'll be able to use them!

Painted T-shirts with Hand Prints and Footprints


Painted T-shirts are are a fun and simple gift, and my daughter always loves getting paint all over her, so be sure to wear old clothes if you make them! All you need is fabric paint (available at most craft stores) and plain T-shirts (they're cheaper at Wal-Mart, Dollar General, or a similar store than they are at craft stores).

Here are a few hand print / footprint designs:

"World's Best Daddy, Hands Down" with hand prints

"Best Granddaddy, Hands Down" with hand prints 


"My Granddaughter Walks All Over Me" with footprints


The best part of painting your own T-shirts is that you can customize them with whatever you call the Dads and Grandfathers in your life: Papa, Papaw, Grandpa, etc. Then, there's the added bonus of just getting messy with paint, so have fun with it!

Saturday, December 24, 2011

Painted Christmas Angel Pedestal Plate

If you find yourself looking for a simple, handmade holiday gift that your children can help make, a painted Angel plate is a great choice!

What You'll Need:
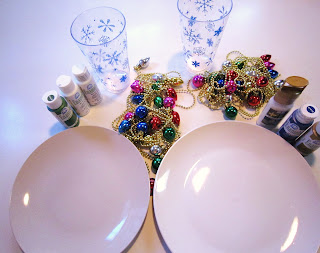
-Plain White Plate (I found these at the Dollar Tree)
-Drinking Glasses (again, these holiday glasses were purchased at the Dollar Tree)
-Folk Art Acrylic Paints (you will need a background color and white)
-Tulip Brand Dimensional Paints (you will need gold and white or clear)
-Strands of Holiday Decorations (Found at the Dollar Tree)
-Thin Cardboard (not pictured)
-Tissue paper (not pictured)
-Glue (not pictured)


To start, paint the top of the plate in whatever color you prefer. We chose a pretty shade of blue, and my four-year-old did a great job of painting (as usual).


Let the background paint dry completely. Then, paint your child's hands(palm side) in white, and ask him or her to make an angel on the plate by placing the thumbs together, then holding the fingers on each hand together, and pressing his or her hands to the plate. This is what it will look like:


Use your dimensional paint to add the angel's halo, name, the year, and any other details you wish. We added stars and a squiggly line around the edge to give the plate a decorative border. Let the dimensional paint dry.

The plate would make a great gift as it is now, or you can continue if you wanted to make it a pedestal plate. To do so, all you need to do is glue the glass onto the bottom center of the plate. I prefer Quick Grip Glue.


Place your holiday strands and tissue paper into the middle of the glass. The tissue paper will make the decorations more visible. Allow the glue to dry.

When the glue is dry, turn the plate right side up, then trace the bottom of the glass onto the cardboard. Cut out the circle, then place the circle up into the inverted glass. This will help to hold the Christmas decorations in the glass.

Here is the finished product!

Saturday, December 17, 2011

Make Your Own Doodle Frame

In the never-ending search for new Grandparent gifts, I came across a Doodlebook Photo Frame and thought it was a cute idea. If you want to make your own as a gift (or for yourself), you can by following these easy steps!


What You'll Need:


-Frame (any size you'd like - I used one for a 4"x6" photo)
-Cardboard
-Plain white paper
-Glue
-Scissors
-Utility knife
-2 Paper clips or binder clips

I picked up a couple of cheap, ugly frames at a thrift store for $1 each. They have blue denim on the front, but it really doesn't matter how ugly they are, because they'll soon be covered. I liked these because they have a flat front, so they provide a nice surface for the pad of paper.

To start, use one piece of paper to make a pattern of the front of the frame. Use this pattern to cut the cardboard to fit the front border of the frame.


Next, cut the paper to the size of the frame and line it up neatly so that the top edges are straight.


Now, lay it down flat on a surface that won't be damaged by the utility knife. Using the cardboard as a guide, gently cut away the inside opening through the stack of paper. It's best to take your time during the step and apply a gentle, even pressure with the knife. If you rush or press too hard, the paper is more likely to tear or have rough edges.


Next, line the top edge of the stack of paper, and clip them all tightly together with your clips. Use a thin, even layer of glue along the top edge to create a pad of paper in the shape of the front of the frame. Lean the pad against something so that it remains upright, and let it dry.


Once the glue is dry, glue the cardboard to the front of the frame. Most any glue would probably work, but I like Quick Grip glue.


Finally, glue the paper to the cardboard by gluing the back page to the cardboard. You can decorate the front page however you'd like.


My daughter added her own, special decorations, and we placed a copy of her annual photo with Santa inside the frame before we wrapped them for her grandparents. Now, whenever she visits, she can redecorate the frame simply by removing the top sheet and coloring the next clean sheet.

Tuesday, July 19, 2011

Print Your Own Board Book or Photo Book - At Home!

Are you looking for a unique gift idea that you can make yourself? My 4-year-old daughter went through a phase a couple of years ago in which she constantly replied, "I can't" to most any request. It frustrated me to no end, so I wrote her a little book about how nothing good ever happens when you think you can't.

I wrote the words and drew some fairly crude, but colorful, pictures using her colored pencils. I cut out the pictures and used my scanner to place them on the pages and save them as a JPG file. Given my target audience, though, I think it turned out nice. It was a big hit with her!

I have since printed more of these books to give as gifts to her friends. It makes a nice, personalized gift that will be appreciated for years. You can use these steps to make a book for anyone of any age. If you've ever wanted to give a parent or grandparent a personalized photo book, you can use this technique to print your own photos and put them together into a book!

What You'll Need:

  • Your book's content in JPG format
  • Self-adhesive, glossy photo quality paper such as Invent It! Project Paper or LD Glossy Inkjet Photo Sticker Paper
  • Ink-jet printer
  • A child's board book that you no longer need (If you don't have one, they can be picked up inexpensively at thrift stores and yard sales)
  • Scissors


1. Create your book and save the pages as JPG files. You can do this through a variety of methods:

  • Write your words and pictures by hand and scan the pages using a scanner 
  • Use software such as Powerpoint to create pages with words and your photos by saving the slides in JPG format
  • Use software such as Microsoft Paint to create pages with words and pictures
  • Use existing digital photos that are already in JPG format, then print any words separately in a word processing program (like Microsoft Word). You can then trim them and attach them separately to your pages.

I'm sure there are other methods that I have missed, but the important thing is to create your content so you can print your pages. Don't worry if the book you create has more pages than your board book. Also, don't forget to create a front and back cover with your book's title and any other information about you and your book!

2. Print your pages using whatever method you normally use to print photos. First, print one test page on regular paper to make sure the dimensions are correct for your board book. Adjust as needed, then reprint on regular paper until it's just right. That way, you won't need to worry about wasting the Invent It Project Paper.

3. Once the dimensions fit your pages, put the Invent It Project Paper in your printer and print out your pages. Let the ink dry completely on your pages before handling them. Trim any excess from your pages (but keep what you trim), peel backing from the Project Paper, and place the adhesive printed page to your board book.

The only tricky parts are making sure each page is centered and making sure there aren't any air bubbles. I like to start in one corner and then gently press it down as I go across.

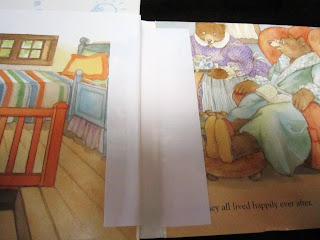
4. If your board book has too many pages, use your scissors to cut out the extra pages by using your scissors to cut the paper on the inside of the book's spine.

Then you can use the extra strips of paper to cover the exposed inner-spine to strengthen the smaller book. Be sure to press the paper down into the crevices.

5. Now you can attach your remaining pages to finish your book.

There you have it! You no longer need to pay to have your photo books printed for Grandparent gifts, Christmas, Mother's Day, Father's Day, or birthdays. You can just create and print your own. Plus, gifts are always extra special when you make them yourself.

If you're giving the book as a gift from your child, you can even leave a couple of extra pages in the middle or at the end, then let your child hand write his or her message using markers, and add his or her own drawings!