There's nothing you can't do.

Saturday, December 31, 2011

Getting Organized for the New Year

I frequently find myself going through piles of stuff that, over time, accumulate on our kitchen table. It drives me crazy. I have also been on the search for a tidy way to keep my four-year-old daughter's art supplies in a place that is convenient for her to grab them whenever she wants.

After searching for weeks, I picked up a few things at the office supply store that worked for us. This is how they look in action! I also added a chalkboard area where we can write messages, menus, and other important info.


This is what I used:


-Cordless drill/screwdriver
-Chalkboard paint and paintbrush
-Drywall screws
-Metal mesh office organizers (I used two small trays out of a four-drawer storage cabinet, two wall file holders, and one small round pencil holder)

The metal items for the wall came in silver and black, but you could easily match your decor by covering them with a couple of coats of paint. I prefer Rustoleum for metal - it always seems to cover the best and is available in a wide array of colors.

The first step is to plan your space. I had a small wall with a round table in front of it, so I was able to put the small trays low and toward the corner. That way, my daughter is able to reach them but they won't be in the way of anyone using the table. I roughly sketched out an area for the chalkboard paint (freehand outline with a pencil), and then evenly spaced the two file holders between the paint and small drawers. I added the small round cup to hold a piece of chalk and small cloth for the chalkboard.


The top file holder will be used for our mail, bills, magazines, and other items that used to take up space on our table. The bottom file holder is for my daughter's drawing paper and coloring books.

Installation is pretty easy if you're familiar with using a drill and screwdriver. Just be sure to use drywall screws if you're hanging these on drywall (or sheetrock). Otherwise, you run the risk of the screws pulling out over time, and everything in your baskets will spill out. 

I didn't use a level, but if you're picky and don't want to just eyeball it, you might want to use a level to make sure they're level and evenly spaced before drilling your holes.

I then painted the chalkboard area. I used two coats, but on some walls, it may take three. Painting thin, even coats works better than one heavy coat. 


There you have it! So far, we all love it, and it really has tidied up our kitchen.

Wednesday, December 28, 2011

New World Pumpkin Soup

This is my favorite pumpkin soup! I came across this recipe a couple of years ago, and it's best with freshly cooked pumpkin.

This is the original recipe. I modified it to accommodate the ingredients I had on-hand:

    -Pumpkin, cooked, 4 cups, mashed 
    -Chorizo sausage, 12 oz 
    -Garlic, 3 cloves 
    -Milk, canned, evaporated, 1 can (13 oz) 
    -Chicken Broth, 2 cup (8 fl oz) 
    -Oregano, ground, 1 tsp

1. If using fresh chorizo, take it out of the skin and break it up into the pan. Cook until sausage is brown. 2. Add garlic and stir until fragrant, 30-60 seconds. 
3. Add the rest of the ingredients, ending with the chicken broth. Add as much broth as you need to make it the thickness you want. Salt to taste.

Serving Size: Makes 7-1 cup servings

Nutritional Info
  • Servings Per Recipe: 7
  • Amount Per Serving
  • Calories: 305.0
  • Total Fat: 22.3 g
  • Cholesterol: 58.3 mg
  • Sodium: 1,074.6 mg
  • Total Carbs: 10.3 g
  • Dietary Fiber: 0.9 g
  • Protein: 15.9 g

Saturday, December 24, 2011

Painted Christmas Angel Pedestal Plate

If you find yourself looking for a simple, handmade holiday gift that your children can help make, a painted Angel plate is a great choice!

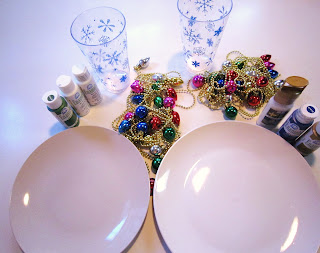
What You'll Need:
-Plain White Plate (I found these at the Dollar Tree)
-Drinking Glasses (again, these holiday glasses were purchased at the Dollar Tree)
-Folk Art Acrylic Paints (you will need a background color and white)
-Tulip Brand Dimensional Paints (you will need gold and white or clear)
-Strands of Holiday Decorations (Found at the Dollar Tree)
-Thin Cardboard (not pictured)
-Tissue paper (not pictured)
-Glue (not pictured)


To start, paint the top of the plate in whatever color you prefer. We chose a pretty shade of blue, and my four-year-old did a great job of painting (as usual).


Let the background paint dry completely. Then, paint your child's hands(palm side) in white, and ask him or her to make an angel on the plate by placing the thumbs together, then holding the fingers on each hand together, and pressing his or her hands to the plate. This is what it will look like:


Use your dimensional paint to add the angel's halo, name, the year, and any other details you wish. We added stars and a squiggly line around the edge to give the plate a decorative border. Let the dimensional paint dry.

The plate would make a great gift as it is now, or you can continue if you wanted to make it a pedestal plate. To do so, all you need to do is glue the glass onto the bottom center of the plate. I prefer Quick Grip Glue.


Place your holiday strands and tissue paper into the middle of the glass. The tissue paper will make the decorations more visible. Allow the glue to dry.

When the glue is dry, turn the plate right side up, then trace the bottom of the glass onto the cardboard. Cut out the circle, then place the circle up into the inverted glass. This will help to hold the Christmas decorations in the glass.

Here is the finished product!

Friday, December 23, 2011

Christmas Veggie Wreath

My friend, The Domestic Goddess (or at least pretending to be), posted this recipe and I thought it sounded perfect to take to an upcoming Christmas party. I changed it up just a little (cheated, actually, by using the philly veggie spread), but overall it was super easy to make, and it was delicious! It was also a big hit at the party, and we only brought a tiny bit home. 

Here is my recipe, modified from the original (linked above):

2tubes (8 ounces each) refrigerated crescent rolls
1container Philadelphia brand Garden Veggie spread
1– 1½ cups chopped fresh broccoli florets
1cup finely chopped celery
1 finely chopped red bell pepper
A fewred cabbage leaves or lettuce leaves
Remove crescent dough from packaging (do not unroll). Cut each tube into eight slices. Arrange in an 11-in circle on an ungreased 14-in pan. Bake at 375 for 15 – 20 minutes or until golden brown. Cool for 5 minutes before carefully removing to a serving platter; cool completely.
Spread the cream cheese over wreath; top with broccoli, celery and red pepper. Form a bow garnish with cabbage or lettuce leaves. Yield: 16 servings
And here is the finished wreath! I love the colors - it all looked so festive!


Monday, December 19, 2011

Make Your Own Vanilla Extract

In the DIY world, making your own vanilla extract is a perfect 10 on the Easy Scale. Plus, it makes a great gift that will impress your friends and family when you tell them that you made it yourself. While it's easy to do, it does take a little time (at least a month), so it requires a little advance planning.

What You'll Need:


-Vanilla Bean
-Jar or container with a tight fitting lid
-Vodka
-Measuring cup
-Kitchen shears or a sharp knife

To start, cut your vanilla bean length-wise, not quite all the way, so that you have a big V.


Place the cut bean into your jar/container, and add 1 cup of vodka.


Tighten the lid, give it a good shake, then place it into a dark place (cabinet or pantry) for about a month.


Shake it every day or two, and after a month, you'll have your own vanilla extract!


If you want to give it as a gift, strain it using a coffee filter or several layers of cheesecloth, and transfer it to a prettier container. There you have it! The best part is that as you use it, you can add more vodka to replenish what you've used.

Saturday, December 17, 2011

This Kitchen Experiment Was a Failure

I love meringue cookies. Not only are they tasty and sweet, they're mostly air so they're low cal. And they're supposed to be crispy, at least on the outside.

I decided to make a batch tonight using this recipe. I made 1/2 chocolate (without the chips) and 1/2 with pumpkin pie spice. Ever since I read the book Anticancer: A New Way of Life, I have tried to substitute Ideal brand sweetener for sugar whenever possible. Most of the time, it works out great, whether I'm baking, cooking, or just sweetening something. Not this time, though.

The meringue batter looked and tasted great. They even had that shine that you only get once you sweeten meringue. I popped them into the oven, and when they were done, the edges were nice and lightly browned, as usual. Once they'd cooled for a minute, though, I picked one up to try it, and it felt like one of those foam squeeze stress-relief balls that corporations give to their employees. They tasted okay, but the texture kind of ruined it for me.


So, why are my meringue cookies chewy and not crispy? A little research confirmed that it's the sugar that makes them crispy. Luckily my four-year-old daughter likes them, and she ate quite a few. I ate a few, too, just to satisfy my craving for something sweet. It'll be the last time I use a substitute for sugar in meringues, though!

Make Your Own Doodle Frame

In the never-ending search for new Grandparent gifts, I came across a Doodlebook Photo Frame and thought it was a cute idea. If you want to make your own as a gift (or for yourself), you can by following these easy steps!


What You'll Need:


-Frame (any size you'd like - I used one for a 4"x6" photo)
-Cardboard
-Plain white paper
-Glue
-Scissors
-Utility knife
-2 Paper clips or binder clips

I picked up a couple of cheap, ugly frames at a thrift store for $1 each. They have blue denim on the front, but it really doesn't matter how ugly they are, because they'll soon be covered. I liked these because they have a flat front, so they provide a nice surface for the pad of paper.

To start, use one piece of paper to make a pattern of the front of the frame. Use this pattern to cut the cardboard to fit the front border of the frame.


Next, cut the paper to the size of the frame and line it up neatly so that the top edges are straight.


Now, lay it down flat on a surface that won't be damaged by the utility knife. Using the cardboard as a guide, gently cut away the inside opening through the stack of paper. It's best to take your time during the step and apply a gentle, even pressure with the knife. If you rush or press too hard, the paper is more likely to tear or have rough edges.


Next, line the top edge of the stack of paper, and clip them all tightly together with your clips. Use a thin, even layer of glue along the top edge to create a pad of paper in the shape of the front of the frame. Lean the pad against something so that it remains upright, and let it dry.


Once the glue is dry, glue the cardboard to the front of the frame. Most any glue would probably work, but I like Quick Grip glue.


Finally, glue the paper to the cardboard by gluing the back page to the cardboard. You can decorate the front page however you'd like.


My daughter added her own, special decorations, and we placed a copy of her annual photo with Santa inside the frame before we wrapped them for her grandparents. Now, whenever she visits, she can redecorate the frame simply by removing the top sheet and coloring the next clean sheet.

Monday, December 12, 2011

Felt Christmas Ornament with Recordable Greeting

Here is another great use for the voice recordable modules from the last post: an easy-to-make felt Christmas ornament with a recorded greeting inside it.

What you'll need:
-Felt pieces large enough for the front and back of the ornament. I just used 2 green triangles and a small brown rectangle to make a tree.
-Fabric glue or craft glue (I prefer Quick Grip Glue)
-Buttons, beads, ribbon, or other decorative items 

-Fiberfill 
-Voice Recordable Module (10 sec) - Available on Ebay
-Needle and thread


Putting your ornament together is pretty simple. My daughter helped pick out a few pretty buttons and ribbon, and she recorded the greeting on the module. We glued the decorations on the front of the ornament and let them dry.

Make sure you cut your felt pieces large enough to accommodate the module, but if you're tight on space, you can trim all the extra wires after you have recorded the greeting you want (and only after you have the greeting you want). To do this, trim off the wires that connect the record button (the red-wired button) and the microphone.


Now, place the module between the two pieces of felt and sew the two pieces together. When you have it nearly sewn together, add some fiberfill to the inside to give it some fluff. Be sure that the play button doesn't get lost inside the ornament - I kept mine at the top so it would be easy for the recipient to press.

Finish sewing the edges, and don't forget to add a ribbon or string at the top so that it can be hung on the tree!


These are great for kids to make, but they would also make a wonderful gift for a loved one who is far away, such as a husband or wife who is overseas during the holidays.