There's nothing you can't do.

Thursday, January 31, 2013

An Easy Way to Clean Out Your Shower Drain

I have really thick hair, and my shower drain tends to clog fairly frequently. It's always best to keep it clean regularly, before it becomes a problem (unfortunately, I speak from experience on this). I used to struggle with bent wire clothes hangers, fancy plastic tools designed for cleaning out showers, plungers, and Liquid Plumr, but in my experience, none of these work as well as a thin barber's comb.


That's right! Remove the drain stop (or even work around it if yours doesn't easily come off), then use the skinny end to grab the clumps of hair (and slimy stuff) and pull it out. 


See? Yuck. But it works great. Be sure to dispose of the gross stuff in either the toilet or trash can - don't just wash it down the shower drain (again, I speak from experience). 

Wednesday, January 30, 2013

An Easy iPad Stand

I'm in the process of Ebaying quite a few supplies from  my Etsy shop. I like to sometimes have Netflix or Hulu running in the background while I work, and up until now I'd been leaning the iPad against boxes or stacks of things.

While preparing my plate stands for sale, I realized I was looking at the perfect iPad stand.


Awesome. I'm keeping this one for my iPad.

Tuesday, January 29, 2013

Creating Things is Essential to my Happiness

This is the single most inspirational piece I have read about the importance of creating, doing, and making. It doesn't really matter what I'm doing, creating, or making, as long as it adds value of some sort, for some one...anyone.

This is why it's always important to, "Make it your own," to quote the American Idol judges. Don't just sing it note for note. Don't just follow the instructions. Modify whatever you're doing to put your own spin on it: create something of your own. You'll be rewarded.

This is why household activities drive me crazy. Most often, they're a waste of time. What satisfaction can anyone possibly get from washing the same dishes every meal, making the same bed every single day, and washing the same clothes over...and...over? None. Zip.

If you perform a task or chore regularly (daily, weekly, etc.), ask yourself, "Can I do this less frequently, and still be just as happy with the results?" If you're mopping just because you've always mopped every other day, you're spending too much time mopping. If you're mopping because you can see dirt on your floor, then it's time well spent.

Sure, it's nice to have a clean house, and a filthy house is not an option, so I always go with the happy medium - and it is happy for me - I spend as little time and energy cleaning as possible. Which means I have more time and energy to create and do. And that is what makes me, and keeps me, happy.

Tuesday, January 15, 2013

Low Calorie, Yet Satisfying Banana Pudding (With Pineapple!)

I'm from the south, and down here, we just love our banana pudding. Few desserts are as comforting and sentimental for me. Now that I'm an adult and have to worry about adult things like my weight and health, I don't get to indulge in my beloved banana pudding as often as I'd like. So I went in search of a healthier alternative. This version is sugar free and gluten free, and believe me - it tastes divine and is oh so satisfying.


Pineapple Banana Pudding

Ingredients: 
2 fresh bananas
1 - 8 ounce can crushed pineapple (no sugar added)
1 1/2 tablespoons corn starch
1/3 cup sugar substitute (I used Erythritol)
2 large egg yolks
1 1/4 cup skim milk
1/2 cup pineapple juice (drained from canned crushed pineapple)

Directions:

1. Open can of pineapple and drain the pineapple and reserve 3/4-cup of the juice.

2. Slice the bananas into 1/4" thick round slices.

3. In a large, lidded glass bowl or glass baking dish, slice one banana to create a layer of bananas.

4. Then add 1/2 the pineapple to create a pineapple layer.

5. Slice the second banana to create a second banana layer, then top with remaining pineapple.

6. Separate the eggs, being careful not to nick the yolks.

7. In a large sauce pan, mix corn starch, sugar substitute, and egg yolks until well blended.

8. Mix in milk slowly, stirring constantly.

9. Stir in pineapple juice.

10. Place pan on the stovetop and bring the mixture to a boil over medium-high heat, stirring constantly.

11. As soon as mixture reaches boiling point, reduce heat to medium, stirring constantly until desired thickness is achieved. Filling should be thick but pourable. Thickening will happen quickly. Due to the pineapple juice, the filling may or may not thicken before it reaches the boiling point, so pay close attention! I stirred mine on the stove top for a little less than 10 minutes before it thickened but everyone's results may differ.

12. Remove from heat as soon as desired thickness is achieved.

13. Immediately pour over banana/pineapple layers, moving the dish to ensure that filling covers all layers and there are no air pockets. Chill in refrigerator for 2 to 3 hours before serving.


Makes 4 - 1 cup servings

Nutrition Facts

Pineapple Banana Pudding
  4 Servings
Amount Per Serving
  Calories178.0
  Total Fat2.8 g
     Saturated Fat1.1 g
     Polyunsaturated Fat0.5 g
     Monounsaturated Fat1.1 g
  Cholesterol93.5 mg
  Sodium45.6 mg
  Potassium483.8 mg
  Total Carbohydrate59.5 g
     Dietary Fiber26.2 g
     Sugars24.6 g
  Protein4.9 g


Monday, January 14, 2013

Make Your Own Bows from Gift Wrap

Out of bows but still want to dress up your gift? It's easy to make your own using strips of gift wrap!

 First, cut a few strips from the end of the sheet of paper.

If the strips are more narrow, they'll be less bulky and easier to loop.


Start on one end and make stacked loops using the paper. Make a final loop on top, then secure everything using tape through the top loop. Use the tape to secure it to your package.


Make several of different sizes and place next to each other for a great three-dimensional look!


Thursday, January 10, 2013

An Inexpensive, Easy Gift for a 60th Birthday

We'll soon attend a 60th birthday party, and everyone has been asked to bring 60 things as a gift. This could work for any birthday, but for some reason, 60 seems to be the popular number to do this sort of thing. Sure, we could take a jar of 60 jellybeans, a bag of 60 buttons, 60 postage stamps, or any number of other things. But what's the fun in that? I chose instead to make a custom, framed print of 60 words that describe the birthday girl.


Luckily, I was able to pick up a brand new float frame from our local thrift shop. I have great luck with frames there and got this one for only $7. The best part of the gift is that if she doesn't like the print, she can just replace it with photos and it's still a nice birthday present.

To make your own, here's what you'll need:

-Poster board
-Markers or pencils (I used three complimentary colors and alternated them)
-Straight edge
-Razor or scissors for cutting a straight edge

First, you'll want to decide on the size of your print. I Chose to keep the print's edges a couple of inches from the frame because I used a float frame. If you have a mat, you may want to fit it to that, or you could fill the whole frame. It's really up to you and the size of your frame.

Once you decide on the size, measure and mark your poster board accordingly. I left the poster board width as is, so I only needed to measure up each side.


I then used the straight edge to draw a line to connect my marks.


I used my razor knife to cut across the line. You could also use scissors, just ensure that you're cutting right on the line.


Once my paper was ready, I searched for an easy-to-draw font that would look good in the print. This page has a wonderful font that I found easy to use and I liked the way it looked on my page.


I came up with a list of 60 words. Thesaurus.com is an excellent resource for this, but you don't want to forget others like Mom, Daughter, Grandma, etc., as well as the person's name, when you're making your list. I kept the font list and the word list open on my screen while I worked.


I found it helpful to lightly write each word in pencil before I wrote it in marker. Since my marker colors weren't all dark, it worked best when I erased most of the pencil prior to using the marker. If you're using dark colors, you may not need to worry about that, though.


I wrote 59 of the words around the page, then saved the center area for her name, written much larger. There you have it! I framed it, and now it's ready to give. I think it turned out great, and I enjoyed doing it.


I have to warn you, though - the fancy writing took more time than I'd originally expected. I spent about 8 - 9 hours total on it, but I spread it out over the course of a few days so that it wasn't too tedious.

Sunday, January 6, 2013

How to Look Younger - Instantly!

Smile. No, really...a big smile. With your lips open, show some teeth. You'll look more youthful, vibrant, and happy. It's a no-lose situation.

That's it! Works every time.

Saturday, January 5, 2013

Thursday, September 27, 2012

An Easy Gift For Your Man

It's always hard to find a good gift for a man - all the men in my life buy something the minute they want it. My husband was in need of a small box to place the items from his pockets at the end of each day, though, and I was lucky enough to find this pretty wooden box at a local thrift store.


It was in great shape but had a couple of nicks and scratches in the wood. I wish I'd taken a before picture, so you could see how easy those were to fix using Restor-a-finish by Howard. 


I can't say enough good things about this stuff - it rocks. I use it for any real wood - on our bedroom furniture, dining room table, wooden trim on the stairs...it really just works great, with no sanding or refinishing. 
I cleaned up the inside of the box using a lint roller, and I added a photo of my daughter and me to the little indented spot in the lid, for a personal touch.


We gave it to my husband for his birthday, and it was a big hit!

Thursday, September 20, 2012

How to Give Yourself (and Your Family) a Haircut at Home

Going to the salon is a pricey endeavor in today's world. Even a quick trim of the bangs can set you back more than a little, and a full wash, cut and style can easily run into the triple digits (and that's before tip!). If you're like me, you're looking for ways to reduce household expenses every day, and the easiest way to save money is to not spend it in the first place.

That doesn't mean you have to let your hair completely go, get it trimmed twice a year, or constantly wear a ponytail or cap. It's easy to trim your hair (and your family's) at home with the right tools: the hardest part is getting past the fear to try it the first time. Once you try and and see the results, though, you'll be hooked!

My husband was easy: he doesn't like the thinner spot he is noticing on his crown, so he decided to go from his longer, wavy locks to a short, uniform cut. He initially went short at a barber shop, but once the cut was in place, it became very easy to maintain using this Wahl trimmer. We have been using it for almost two years now, and I have to say, it paid for itself after the first month. It's so easy to use, and it only takes a few minutes every couple of weeks.

My daughter and I were a little harder. Neither of us was particularly interested in the Sinead O'Connor look, so I had to look a bit harder for the right tool for the job. Both of us have thick, medium-length hair, so keep this in mind - what works for us may not work for other hair textures and/or lengths.

After a little bit of online research (I love online reviews - what did we ever do without them?), I found the Seki Edge. Its low price and great reviews convinced me to give it a try, and I have to say that I love it! I have used it on myself and my daughter, and it's so simple to use.

Here are a few pointers I have learned:
-Start with a salon cut you like, that way you can follow the same shape without having to experiment yourself.
-Start with longest setting, and when you get more comfortable, and if you want, work your way up. It's easier to cut more than to realize you've cut too much, then have to wait for it to grow back out.
-Never start at or near crown. Same as the above - you can always move up a little as you go, but if you start to trim near your crown, you'll have a bit of spike going on, whether you want it or not.
-Use a light touch - don't apply a lot of pressure.

And for any styling and cutting tool, always follow the manufacturer's recommendations for cleaning and maintenance. Cleaning and maintaining trimmers and tools will prolong their life and ensure that they remain clean, so take a few minutes after you use them each time to clean them up!

Once you get some confidence and want to try different styles, there are many awesome how-to videos now available online for practically any style. I'm really impressed by the wealth of information that is out there - have fun with it and feel free to experiment - you'll love the results and so will your wallet!


Monday, September 17, 2012

LIT (Little Irritating Things), First in a Series

We all have them...those little things that just irritate us. They aren't necessarily wrong, but they're irritating nonetheless. I'm sure I'll add to this list as I go forward, so consider this first in a series of posts about my Little Irritating Things, or LIT™.

1. When someone uses common words as a phrase, then turns them into an acronym, trying to be cute. It's even worse when he or she throws in a little ™ at the end. 


Okay, okay...seriously, though...


2. When an employee of an organization refers to other employees as "My staff". They aren't yours. You certainly don't own them. But you have told us all we need to know about how you think of them and want to control their every move. And that you're better than they are. You aren't, though.


That's it for today, kids! 

Friday, September 14, 2012

How to Decorate a Purse

I recently came across a fairly plain black messenger-type handbag, and I thought it had promise. I picked it up at a thrift store for $4 and it's in really good condition.


The weave in the front got my attention - I immediately thought it would be fairly easy to dress it up with several different colors of ribbons.


I picked up some pretty ribbon in autumn colors at the local craft store, and pulled out some Quick Grip Glue (this stuff really does work great on everything!).


I decided that I didn't want to weave ribbon into each spot of the purse - I wanted to leave some areas black. For the areas I wanted to fill, I cut the ribbon about an inch longer than I would need on each size (so 2 inches longer total). I then wove the ribbon into the front of the purse, following the pattern that was already there.


I placed a little dab of glue at the outer edges of each piece of ribbon to hold it in place, and that's it!

The best part is that when I get tired of these colors, I can replace the ribbon with new colors.


Obviously, this method won't work for many purses, but hopefully it will inspire you and give you a some new ideas!

Saturday, July 21, 2012

How to Stuff a Large Pillow on the Cheap

I recently came into some good-sized fabric scraps, and thought they'd make nice sofa pillows for our den. Our sofa is a dark brown, and the walls are painted a very light green. The fabric, striped with shades of taupe, blues, and greens, brought the two together nicely.


Polyfill, or any type of fiberfill, can cost a fortune - anywhere from $10 - $20 a bag. The large pillows I made here would have taken 5 - 10 bags, which would have made these pillows much more pricey than I would like. Instead of purchasing filler, I decided to look around our house for alternative stuffing to see if I could find anything usable. My pack-rat habits paid off for once!


I had a large bin of fabric scraps which were mostly sweater pieces. Many were wool sweaters that I'd felted. Others were leftover sleeves and t-shirt pieces left from long-finished projects. I decided the sweaters were ideal because they were bulky but not too heavy.

I sewed the fabric as I normally would to make a pillow: with right sides together, sew three sides along the edge, then sew the fourth side partially, leaving an opening wide enough to stuff the insides. Turn right sides out, then start stuffing.


I didn't quite have enough sweaters to completely fill both pillows, so I finished off the rest with an old mattress cover and the contents of an old bed pillow.

Once the pillows were stuffed, I hand-stitched them closed, and they were done! We love having them on the sofa - it really does make the sofa more comfy, and I love how they brighten up the room.


One drawback: these pillows are heavier than they would have been with fiberfill. However, given the fact that I ended up with huge, great-looking pillows for free, I don't mind it at all!

Sunday, July 15, 2012

Fun with Little Bottles

I love little bottles, and so does my daughter. Whether it's those little airline-sized liquor bottles or the maple syrup bottle from Cracker Barrel, it's easy to turn it into something pretty and useful.

Take something like this:

and instead of tossing the bottle when you're done, dress it up a little.

My daughter simply stuck a jeweled sticker tattoo on this one and made a lovely vase:

You could also use paint to create a lovely and functional piece of art.

They're the perfect size for a single flower - we love them!


Wednesday, July 11, 2012

Ginger Lavender Lemonade: My Favorite Summer Drink


Last year, I bought a gallon ziploc bag full of lavender, thinking I'd be all crafty with it and stuff. Of course, here are, the bag and I, not getting any younger...so, I discovered how delicious it is brewed and mixed up as a lemonade. Then, I discovered Domaine de Canton. Wow! Altogether, it makes a most delicious summer drink. Rather than clash, the mild spice flavors of lavender and ginger compliment each other very nicely.


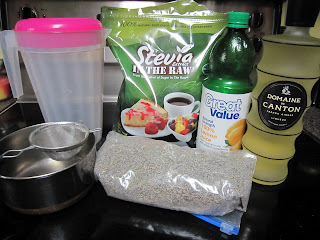
What You'll Need:
-1/4 c. Dried Lavender
-1/4 c. Lemon Juice (or fresh lemons if you're picky like that - obviously, since mine is from Wal-Mart, I'm not)
-1/2 c. Sweetener
-A Pitcher or something to put it in that will hold 2 - 3 quarts (mine pictured is 2.75 quarts)
-A Strainer
-Domaine de Canton ginger liqueur
-Water, ice, and a glass

First, combine 1/4 c dried lavender and 2 c. water into a pot and bring to a boil. Remove from heat and let brew for 10 minutes. Bonus: your house will smell like Avignon in late spring.


Meanwhile, mix the lemon juice, sweetener, and about 1 quart of water (or a combination of water and ice) in your pitcher.

When the lavender has brewed for 10 minutes, pour it through the strainer into your pitcher, and mix well.


In a glass, add 1 oz. Domaine de Canton and ice, then fill the glass with your lavender lemonade. Mix, then drink.

So delicious.