There's nothing you can't do.

Monday, February 13, 2012

How to Make Cupcake Paper Carnations

I'm always looking for easy crafts for my 4-year-old, and she had a great time making these pretty carnations for Valentine's Day. They're really easy for little hands to make, as long as an adult helps with the steps that require a sharp knife.


What You'll Need:
-Cupcake cups / muffin pan liners of various colors
-Green chenille stems (pipe cleaners)
-Sharp pointed knife

Start by creating groups of 2 - 3 cupcake cups, and use your sharp pointed knife to cut two holes in the bottom, spaced about 1/2" apart. 


Start by making a hook out of one of your pipe cleaners. From the top, push the long end of the hook through one hole, then push the short end through the other hole, ensuring that both ends go through all cupcake cups.


Gently tug the pipe cleaner down until the top of the hook is up against the cupcake cup.


While holding both ends of the pipe cleaner up against the bottom of the cup, use your other hand to squeeze the cup from the bottom up, slightly twisting as you go.

Add another cupcake cup group from the bottom up, by inserting the long end of the hook into one hole and then moving it up, until you can then feed the small end of the hook into the other hole. Gently push the new layer up against the first layer.


Again, hold the pipe cleaner under the cups and use the other hand to squeeze the papers together, gently twisting as you go.

Continue adding more layers until you have the fullness you desire.


When you're done, twist the small end of the pipe cleaner around the large end. If desired, you can fold the long pipe cleaner in half and twist it around itself to make it strong enough to hold the flower. You can also wait until you have an entire bouquet and twist them all together. 


 This was such a fun craft for my little girl. I cut the holes for her and she enjoyed doing everything else herself! 

Sunday, February 12, 2012

30 Things to Stop Doing to Yourself

All of these, especially #23.

Friday, February 10, 2012

Make a Heart-Shaped Wreath for Valentine's Day

It's that time of year again, when everywhere you look you see red hearts. Love is in the air, and if you're feeling festive and want to decorate, try this easy DIY wreath from upcycled materials.


What You'll Need:
-Wire Clothes Hanger (2 will be needed for a large wreath)
-Pool Noodle
-Duct Tape
-Scissors
-Needle nose pliers
-Fabric (I used a red sweater that had a fringe trim)
-Ribbon and any other decorations of your choosing
-Small plastic bead necklace
-Needle and thread (or glue)


First, cut your pool noodle into 2 pieces of the same length. If you don't want a large wreath, you don't have to use the entire noodle, but it's better to start with pieces that are too big and trim them down than to start with pieces that are smaller than you'd liked.

Then, use your needle nose pliers to cut the hooked top off the wire hanger. Straighten out what remains of the wire hanger, and check its length against the pool noodle pieces. The wire should be long enough so that several inches of wire remaining stick out of each side of the noodle pieces.

If one piece of wire is long enough for both pieces of pool noodle, cut it in half; if you need more, prepare a second wire hanger by cutting it and straightening it. Feed each piece of wire into the hollow centers of the two pieces of pool noodle.

Start molding the pool noodles into a heart shape. Bend the wires as you go so that the noodle holds its shape. You'll want to cut notches into the underside of curves so that the noodle bends easily. Cutting the upper edges of the heart at an angle will also help the heart fit together more easily.


Cut the top of the bottom pieces of the noodle at an angle as well, so that they are flush.


Use your needle nose pliers to twist the two pieces of wire together. Once they are twisted, use the pliers to trim away the extra wire.


Now, use pieces of duct tape to ensure that everything stays put. I taped the stress points - where the two pieces joined together at the top and bottom, as well as the curves of the heart.


I then cut the fabric of the sweater to wrap the noodle all the way around, plus a few inches for overlap. I used a needle and thread and a simple tacking stitch to join the fabric edges together and attach the bow and hanger, but you could also use fabric glue or a hot glue gun if you don't want to sew.


That's it! You can always buy a wreath form at a craft supply store, but I had a pool noodle that I really didn't want to throw into a landfill. By turning it into a wreath, I'll be able to enjoy it for years to come!

Tuesday, January 24, 2012

Make Your Own Laundry Detergent

If you're looking for easy ways to save money on household items, one easy way you can do so is to make your own laundry detergent. I started making my own a little over 2 years ago because the commercial detergents' scents were too strong for me, and the "Free" products were expensive. This recipe works well in our front-loading machine. It cleans well (I do still use Oxyclean spray to pre-treat heavy stains, but everything else comes right out), has a very light scent, and is easy to make. Plus, I love the fact that as long as I'm well-stocked on the ingredients, I never run out - I just make more when I need it!

What You'll Need:
-2 cups Arm & Hammer Super Washing Soda (in the laundry aisle, but regular baking soda works if you can't find it)
-2 cups Borax
-1 bar Ivory soap
-Air-tight storage container


First, grate the bar of soap.


Then, add the Washing Soda and Borax. Mix it all together.


Transfer the mixture to air-tight storage, and that's it! I use 4 Tbsp. of this powder in our small front-loader. If you have a larger machine, you may want to try a little more.

Friday, January 20, 2012

How to Make Your Own Photo Mat

Do you ever find a great frame and it's close, but not quite the dimensions you need for your photos and prints? A pre-made photo mat would take care of the uneven edges for you, but even the cheap mats can get pricey. Making your own with traditional materials can get tricky if you don't measure and cut just right. Instead, you can make a quick and easy custom photo mat that will look great and be ready in minutes, with no special tools or equipment.

What You'l Need:
-Frame
-Picture(s)
-Ribbon
-Scotch Tape
-Scissors

First, start with your pictures and frame. This frame and mat looked good, but the pictures were slightly smaller than the pre-cut openings.


 I happened to have some narrow blue velvet ribbon that would not only even out the photo edges, but give the frame a nice little splash of color.

I cut four pieces of ribbon for each opening and taped them in place. The lengths don't have to be exact, as long as the exposed edges look uniform.


There you have it! It looks much better, and only took a few minutes. 


This also works if you don't have any mat at all - I used a wider ribbon for a situation like this:


Using your own ribbon allows you to be more creative, too. You can layer them for added color and texture, or use ribbon with printed designs to match your decor. The possibilities are endless!

Tuesday, January 17, 2012

Does your nose run when you run?

If you're a runner, you're probably familiar with the term, "snot rocket." There are a few good reasons why we get runny noses when we run - most races and training schedules occur in the mornings, when the weather is cooler, and cooler temperatures make runny noses. Most runners try to inhale through their noses, which means dust and pollution can get filtered out of the air and trapped in nasal passages. Those irritants can also cause noses to run - it's just the nose doing its job to keep that other stuff out of your body.

While I may see the logic in my runny runner's nose, I don't particularly enjoy the idea of blowing my nose out into the air. My southern sensibilities aren't exactly keen on some of the other options, either, like blowing my nose into my sleeve or hand. 

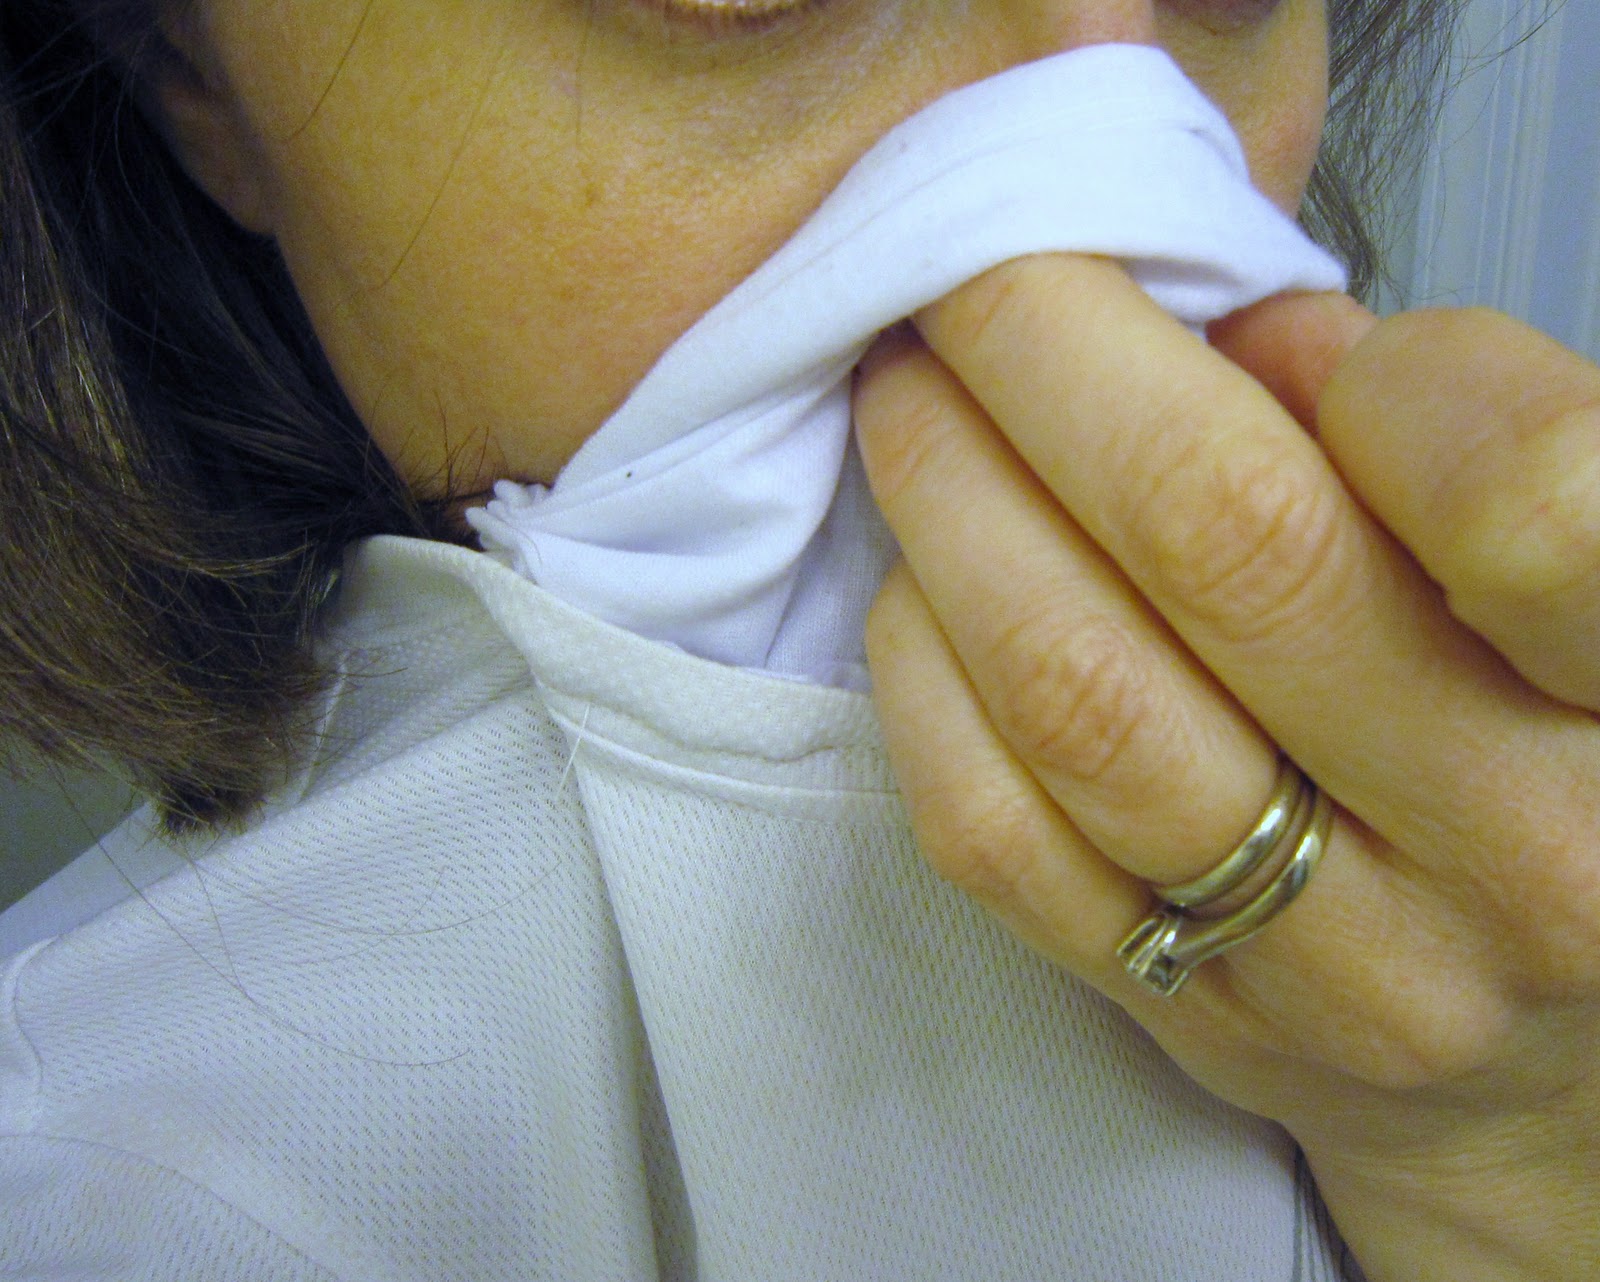
So, I constructed a little hidden pocket in my running shirt. It makes a nice little, "snot pocket" in which to blow my nose while I'm running. It's double-lined, and it folds back up on its own, so that the snot is tucked away inside.

What you'll need:
Running shirt
Handkerchief
Needle and thread (or sewing machine)
Scissors

To start, fold the handkerchief in half, then cut the folded hanky in half. 


I cut mine in half to make it less bulky, but this is a personal preference. If you wanted, you could make it full size, or cut it even smaller if the half-size is still too bulky for your tastes. 

Since I cut the finished edge, I hemmed the cut, unfinished edge of the hanky so it wouldn't ravel. 

I just folded a small piece over, stitched it, folded again, and stitched again. I didn't bother measuring or pinning - it really shouldn't matter for this project.

Next, I folded the hanky like a fan or accordian. I positioned the hanky so that it followed the curve of the shirt's neckline and pinned the edges onto the inside of the shirt. 


I sewed the outside edges to the shirt. I then sewed the inside single fold to the shirt following the neckline. 


This stitch should help it fold back into place after you use it.

Now I can blow my nose into a hanky while I'm running, with just one hand and without slowing my pace, and the hanky will just fold back up into my shirt! 


Saturday, January 14, 2012

How to Save Money and Actually Enjoy Chuck E. Cheese's

Oh sure, kids can be kids at Chuck E. Cheese's, but few other restaurants cause an adult to groan at the mere mention of the name. It doesn't necessarily have to be this way, though. If you time it right, it can be almost as much fun for you!

Before You Go
There are almost always coupons and free tickets to be found online. First, visit the Chuck E Cheese's website, where you should be able to win some free tickets. Click on Chuck E-Games, and you should be able to find at least one game you'll be able to play in order to win free tickets.


The current game (above) is Chuck E Blocks. Play the game (it shouldn't be too hard), print out your winnings, and take the sheet with you to the store.

You'll also want to check RetailMeNot for other coupons. Many times, you will find printable coupons for extra tokens here.


I have used some of the coupons listed here, and they have worked every time for me!

When to Visit
This can really make or break your CEC experience. Bar none, go as early as possible, preferably on a weekday. There are 3 really important reasons for this:
  1. Everything is nice and clean, and probably germ-free.
  2. There aren't many people there (you'll probably be the only ones there, if you get there early).
  3. If you get there early, Monday - Friday, you have an excellent chance of getting A LOT of free tickets! This is what makes the CEC experience fun for me, as an adult. There's no denying: it feels great to get a bargain! My local CEC opens at 9 each day. If I get there between 9 and 10, we're usually the first there. The lucky CEC staff that open the shop also get to test each and every game, and...they leave the tickets in each game for you to take! 

The employees test the Ticket Muchers, too, so don't forget to check those! On our most recent visit, we got 395 free tickets, before we paid a single dime for a token! Surprisingly, we got there at 10:30, 1 1/2 hours after they opened.

So, by the end of the day, this is what we took home, for only about $15!

How awesome is that? Yes, I realize the retail value of all of this is only about $6 (at most), but it's hard to put a dollar value on something as awesome as a man-sized mechanical mouse that sings to your daughter every hour on the 30!

Tuesday, January 10, 2012

Another T-shirt Yarn Scarf

After I made the last scarves from T-shirts, I came across this awesome-looking scarf made from t-shirt yarn and a crocheted cuff. I decided to give one a try, but since I don't crochet, I used a felted wool sweater. For the T-shirt yarn, I used three large t-shirts.


For the most part, I followed her directions, but my t-shirts didn't quite give me 12 strips that were 144 inches long. Mine were about 96 inches each, so I went with that. 


Since the felted wool sleeve's knit was very tight, I used a chop stick to push the edge through the bottom of the sleeve and out the other side, then I was able to pull them through until they hung evenly out each side. 

It isn't perfect, but I like it!

Friday, January 6, 2012

Make a Dog Sweater from an Old Human Sweater, New and Improved!

In a previous post, I made an ugly little dog sweater from an old human sweater. While it was easy to do, it wasn't very pretty, and I vowed to make something that would make my chihuahua proud to wear in public.

I picked up an old pink sweater from a thrift shop, and the sleeve was the perfect size for him.

It's so easy! All you have to do is:
1) Make sure the cuff fits comfortably over your dog's head.

2) Cut holes for the front legs.
3) Cut an opening in the lower belly so your dog can do his or her business without getting the sweater dirty.
4) Finish the edges with a zigzag stitch (on the machine) or a whip stitch (by hand). Note that if you use a felted wool sweater (100% wool sweater, shrunk to felt by washing in hot water and drying in the dryer), you don't have to worry about loose threads and won't need to finish the edges.


 He loves it!

Thursday, January 5, 2012

T-shirt Yarn Crafts

I found a beautiful necklace on Etsy, and it's made from T-shirt yarn.


Isn't that gorgeous? How have I never heard of  t-shirt yarn before? So I did a little investigation (aka a search on Google), and it turns out that it isn't all that hard to make.

Here is a handy tutorial on how to make t-shirt yarn (or t-rope, as the instructor calls it), and this video shows you how to use t-shirts to make a couple of different types of scarves. I happen to have a few old t-shirts that I was hoping to do something with, so I pulled them out and started experimenting.


My first attempt wasn't exactly what I'd hoped it would be: I started with the blue and it didn't seem full enough, so I added in a couple of pieces of white to each side. It still just looked like an old, shredded t-shirt to me, though.


I had much, much better luck with the loose t-rope strands, though. I thought they turned out awesome, and I wanted to dress them up a bit. I loved the look of the fabric rose on the one pictured for the scarf tutorial, so I found this online tutorial to make a pretty, fabric rose.


I think it turned out great! The rose really does dress it up, and I love the look that burning the petals' edges gives it.

I sewed the rose onto a fabric-covered elastic band to make it easy to attach to the scarf (or a hair band, or anything else!). I can just loop the elastic over the rose, then fold the outer petals down to cover it.

So, I still wanted a flouncy, ruflle scarf, so I hit up the local thrift store and found a couple of t-shirts for $1, brought them home, and got to work.

I'm still in shock at how quickly you can make a t-shirt scarf using the methods in the video above. I made two new ones in about 30 minutes, at a cost of $2, plus the cost of a little fabric glue.

These turned out much, much better! I found the secret to getting a pretty ruffle is to start wide then taper slowly as you go, ending with a narrow cut. That really did make all the difference!

Here are the two new ruffle scarves:


 I would never guess that they were made with t-shirts!

Now, back to that necklace...I'm pretty sure I'd never be able to make something that cute, so for now I'll just have to leave it in my Etsy favorites. Hopefully I'll be able to buy it (or one like it from her lovely shop) very soon!

Monday, January 2, 2012

Wal-Mart

Love it or hate it, you have to admit: Walmart attracts the weirdos.

Good Drink

Know what makes an excellent mixer? SoBe lifewater. It's incredibly yummy all by itself (every flavor I have tried so far, although Acai Fruit Punch is most excellent with Vanilla Vodka).

I used to be a die-hard diet soda drinker. Seriously, I was an addict. I was finally able to kick the habit last year after reading Anticancer, A New Way of Life, a phenomenal book about proven ways to minimize your risk of getting cancer. It seriously should be required reading for all humans. Cancer is no joke.

Not only does SoBe lifewater taste great, the sweetener used in it is a naturally derived antioxidant.

And did I mention it's a great mixer?